Cloudflare Settings for WordPress: My Exact Free Plan Setup
Some links on WebPickr are affiliate links. If you buy through them, we may earn a commission at no extra cost to you. Read our affiliate disclosure.
These are the exact Cloudflare settings for WordPress that I use on WebPickr, on the free plan. The site runs on my own VPS with aaPanel and Nginx, and FlyingPress handles caching and optimization. Every screenshot in this guide comes from my own Cloudflare dashboard.
Most Cloudflare guides list every toggle and tell you to turn it on. That is how people end up with Rocket Loader fighting their cache plugin, or with a contact email that shows up as “[email protected]”. I will show what I turned on, what I left off, and the one setting I found broken on my own site while writing this.
Quick summary
- SSL is on Full (strict) with a free Let’s Encrypt certificate on the server, and the minimum TLS version is 1.2.
- Rocket Loader stays off. FlyingPress already delays and defers JavaScript.
- FlyingPress creates the Cloudflare cache rules itself, so full pages are cached at the edge on the free plan. My homepage returns
cf-cache-status: HIT. - Smart Tiered Cache is on. It is free and sends fewer requests to the server.
- Email Address Obfuscation is off. It was replacing my email address in 7 places in one guide.
- AI training crawlers are blocked. Search engines and AI search bots are allowed.
Table of Contents
My Results: Pages Served From Cloudflare, Not the Server
Before going through the settings, here is the test that shows they work. I requested the homepage twice from Windows Command Prompt with curl -sI https://webpickr.com/. This only reads the response headers and changes nothing on the site.
The first request returned cf-cache-status: MISS. Cloudflare’s Dhaka data center did not have the page yet, so it fetched it from my server and stored it. The second request returned HIT with Age: 324. The page had been sitting in Cloudflare’s cache for 324 seconds, and my server was not involved at all.
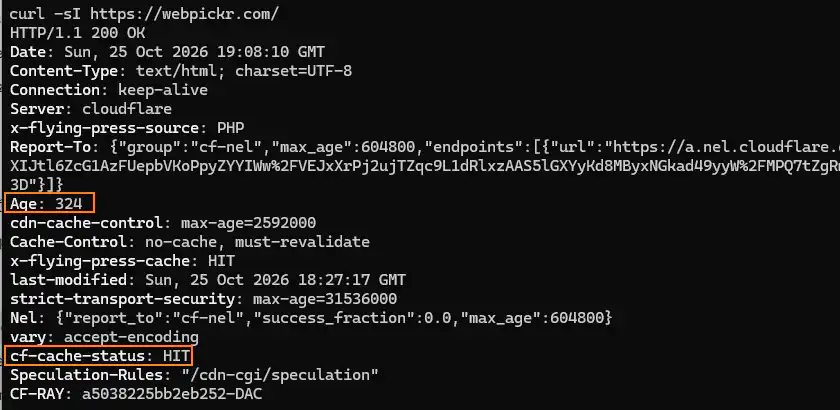
These are the headers that matter:
| Header | What it means |
|---|---|
cf-cache-status: HIT | Cloudflare served the page from its own cache |
Age: 324 | How many seconds the page has been in Cloudflare’s cache |
cdn-cache-control: max-age=2592000 | FlyingPress tells Cloudflare it can keep the page for 30 days. A purge removes it right away |
Cache-Control: no-cache, must-revalidate | Browsers must check for a fresh copy, so visitors see updates right after a purge |
x-flying-press-cache: HIT | When the server is asked, FlyingPress serves a ready page instead of building it in WordPress |
The Setup Behind These Settings
- Cloudflare plan: Free
- Server: my own VPS with aaPanel and Nginx
- Theme: Kadence (free)
- Cache and optimization: FlyingPress with its Cloudflare page caching integration (my FlyingPress settings)
- Email: Cloudflare Email Routing for receiving, Brevo for sending
I have bought domains from Namecheap, Spaceship, NameSilo and DreamHost, and moving them to Cloudflare works the same way everywhere. Add the site in Cloudflare, copy the two nameservers it gives you, and paste them in your registrar’s nameserver settings. The registrar does not change anything in this guide.
If you use a different cache plugin, or none, most of this still applies. Only the caching section depends on FlyingPress, and it includes the options for other setups.
DNS: Proxy Only What Serves the Website
The orange cloud (Proxied) sends traffic through Cloudflare. The grey cloud (DNS only) points straight to the target. Only the records that serve web pages should be orange.
| Record | Proxy status | Why |
|---|---|---|
| A record for the root domain | Proxied | This is the website. Without the orange cloud there is no caching, SSL at the edge or protection |
| CNAME for www | Proxied | Visitors who type www also go through Cloudflare |
| MX and email TXT records | DNS only | Mail records cannot be proxied |
| Brevo DKIM CNAMEs | DNS only | Email providers must see the real values to verify the domain |
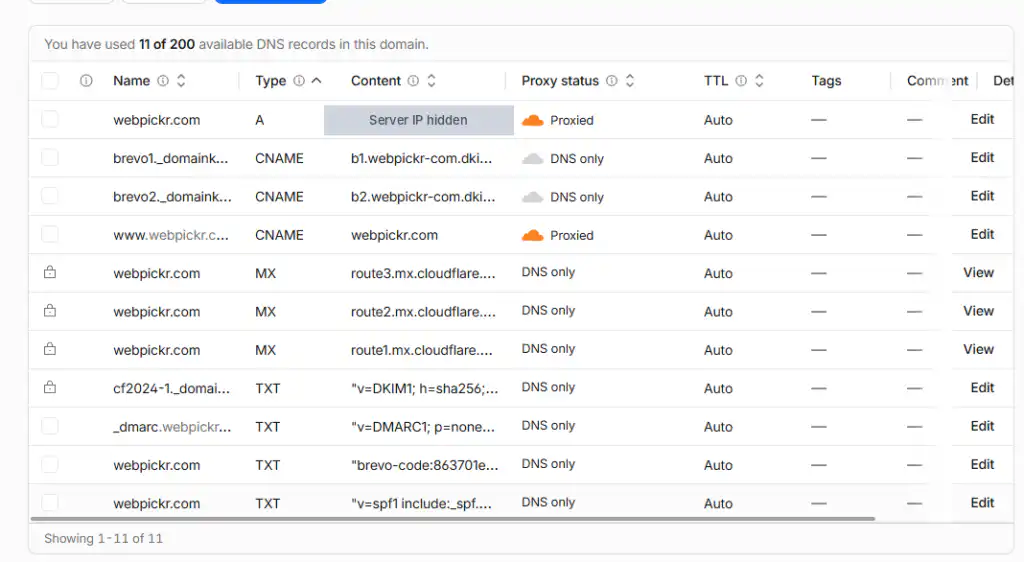
Never share a screenshot that shows your server IP. If someone knows it, they can send traffic straight to the server and skip Cloudflare’s protection.
SSL/TLS: Full (strict), Not Flexible
Flexible mode encrypts traffic only between the visitor and Cloudflare. The connection from Cloudflare to your server stays plain HTTP. Full (strict) encrypts both sides and checks that the server’s certificate is valid. Cloudflare itself strongly recommends Full or Full (strict).
I have run sites on Cloudflare for years, and many of my older ones were never on Full (strict). On WebPickr I issued a free Let’s Encrypt certificate in aaPanel first, then switched to Full (strict). It worked on the first try with no errors. The only condition is that the certificate on the server must stay valid. If it expires, Cloudflare shows Error 526 instead of your site, so make sure your panel renews it automatically.
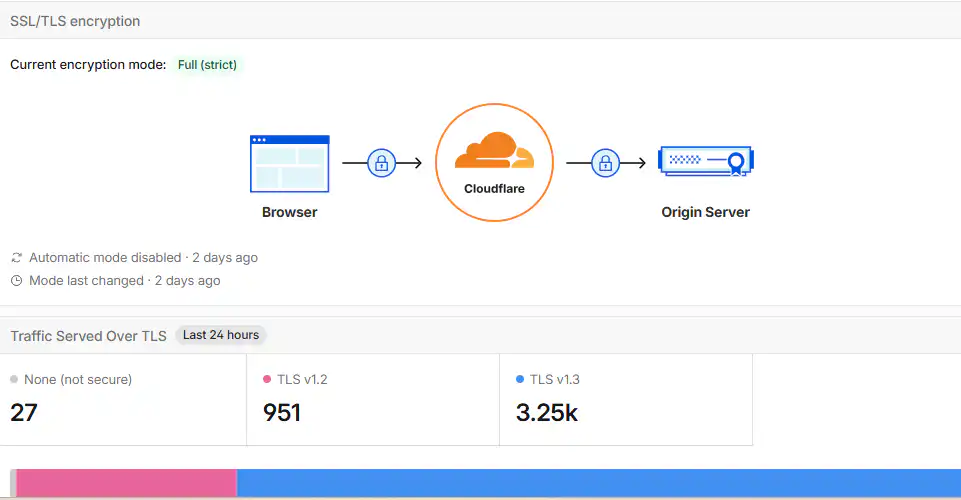
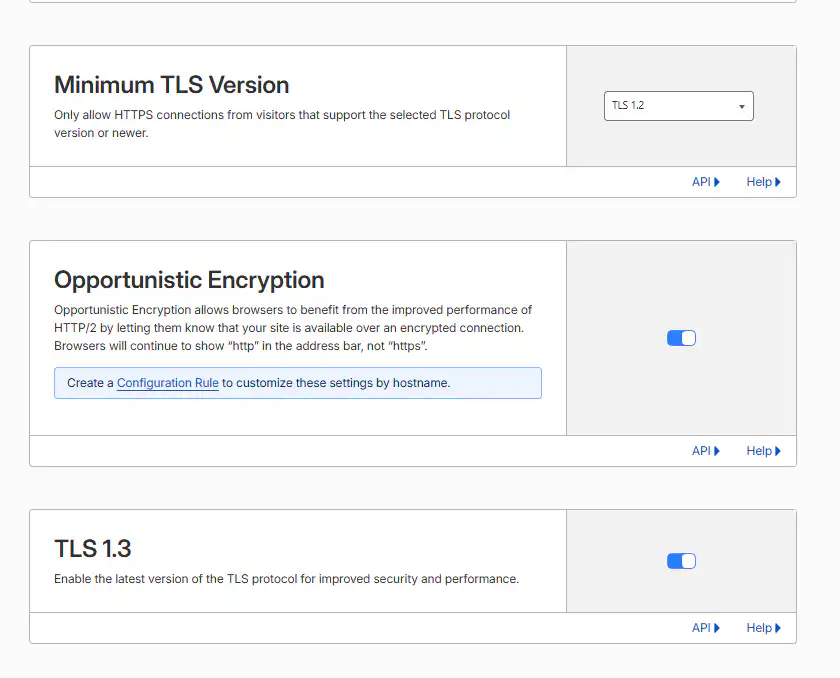
These are my settings under SSL/TLS > Edge Certificates:
| Setting | My value | Why |
|---|---|---|
| Always Use HTTPS | On | Every HTTP request is redirected to HTTPS at Cloudflare |
| Minimum TLS Version | TLS 1.2 | The default is TLS 1.0. My traffic report showed visitors only on TLS 1.2 and 1.3, so raising it blocked nobody |
| TLS 1.3 | On | Faster and more secure connections |
| Automatic HTTPS Rewrites | On | Fixes old http:// links to images or files |
| Opportunistic Encryption | On | Default, harmless |
| HSTS | Off in Cloudflare | My server already sends an HSTS header, so enabling it here would add nothing |
Be careful with HSTS if your server does not send it yet. Once a browser sees it, it refuses plain HTTP for the whole max-age period, often a year. Turn it on only when you are sure HTTPS will always work.
Speed Settings: What I Turned On and What I Left Off
Go to Speed > Settings. On the free plan, the most important decision here is what to leave off, because a cache plugin already does part of this work.
| Setting | My value | Why |
|---|---|---|
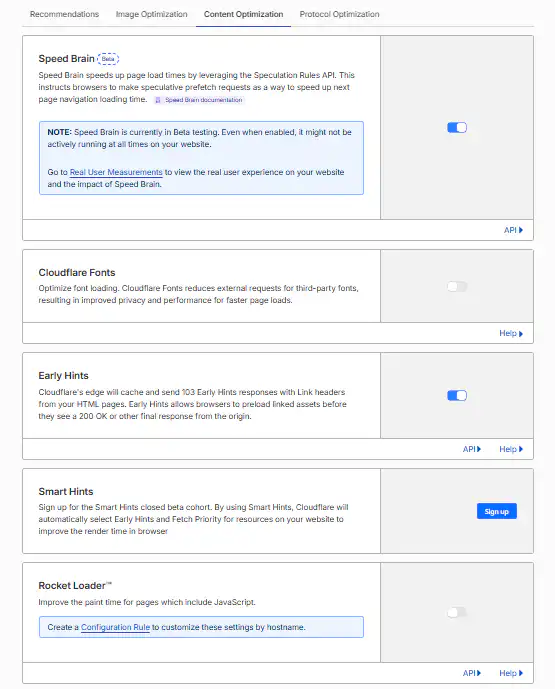
| Rocket Loader | Off | If your cache plugin already delays or defers JavaScript, keep it off. FlyingPress does this on my site, and FlyingPress’s own Cloudflare docs say Rocket Loader may conflict with its script optimization |
| HTTP/2, HTTP/3, 0-RTT | On | Faster connections, no downside |
| HTTP/2 to Origin | On | Nginx on my server supports it |
| Early Hints | On | Lets browsers start loading key files earlier when the server sends preload hints. Free and harmless |
| Speed Brain | On | Prefetches the next page only from Cloudflare’s cache, never from the server |
| Cloudflare Fonts | Off | FlyingPress already handles fonts on my site |
| Web Analytics (RUM) | Off | Adds a separate Cloudflare script to every page. I will choose one analytics tool later instead of running two |
| Polish (image compression) | Not available | Pro plan only. FlyingPress converts my images to WebP instead |
| APO | Not used | Paid add-on. The FlyingPress integration caches full pages for free, and FlyingPress says APO should be off when you use it |
What about Auto Minify?
You will not find it anymore. Cloudflare removed Auto Minify on August 5, 2024, and many older guides still tell you to turn it on. Your cache plugin should minify CSS and JavaScript instead.
Speed Brain and FlyingPress together
FlyingPress also prefetches pages when a visitor hovers over a link, using the same browser feature. I kept both on, because Speed Brain only serves pages that are already in Cloudflare’s cache and never sends extra requests to the server. I have seen one 2024 report of Speed Brain breaking plugin updates while it was in beta. If WordPress admin tasks start failing for no reason, Speed Brain is the first thing I would switch off.
Caching: Let FlyingPress Create the Rules
By default, Cloudflare caches only static files like images, CSS and JavaScript. HTML pages still come from your server. The FlyingPress integration fixes that on the free plan. You add your Cloudflare Zone ID, email and Global API Key in FlyingPress > CDN, turn on page caching, and FlyingPress creates the cache rules in your Cloudflare account.
Do not create your own HTML cache rule next to it. FlyingPress keeps its rules in sync with its own exclusions, and when you update a post it purges only the HTML pages, so images and CSS stay cached.
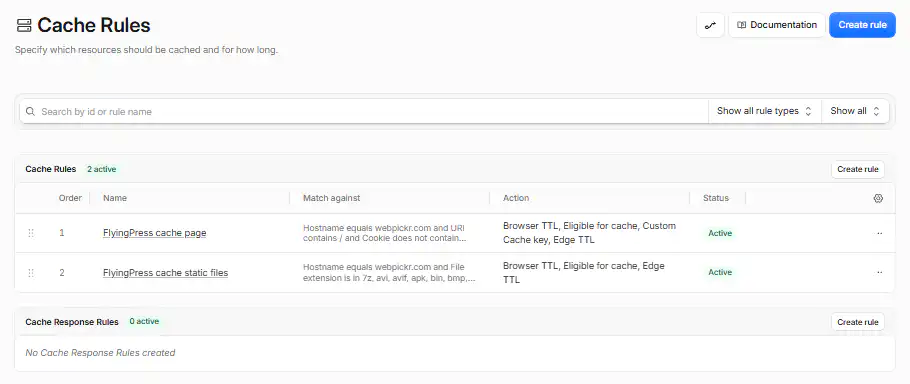
The two rules FlyingPress creates
| Rule | Matches | Edge TTL | Browser TTL |
|---|---|---|---|
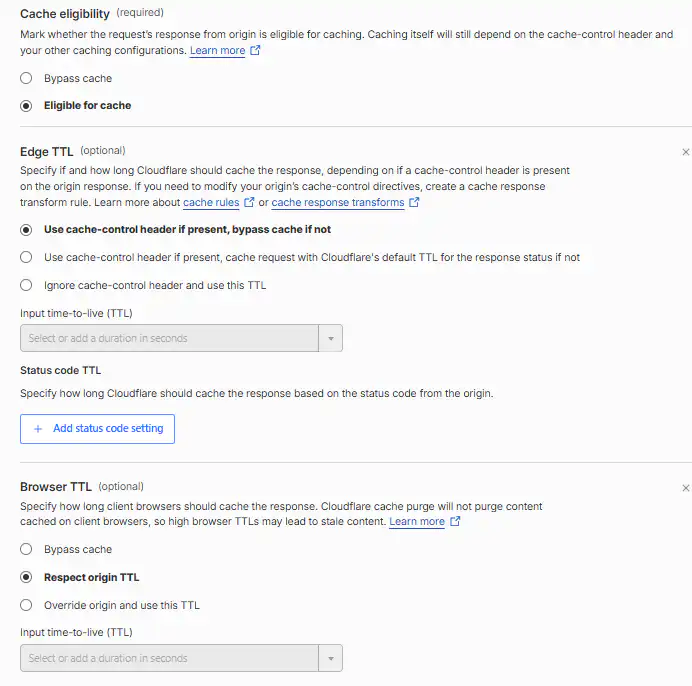
| FlyingPress cache page | Every URL on the domain, except when the wordpress_logged_in cookie is present | Use the cache-control header, bypass if there is none | Respect origin TTL |
| FlyingPress cache static files | Files like CSS, JS, images, fonts, PDF and ZIP | 1 year | 1 year |
The page rule is the clever part. Logged-in users always bypass the cache, so nothing from your admin view ends up in front of visitors. Pages that FlyingPress does not cache, like the login page, do not get its CDN cache header, so Cloudflare skips them too. Because the browser TTL respects the server’s no-cache header, visitors see a new version right after you purge.
The static rule caches files for a year. That is safe because changed CSS and JavaScript files get a new file name or version number, and WordPress gives new uploads their own file names. The page rule also has Cache by device type turned on, because Separate Mobile Cache is enabled in my FlyingPress settings.
Not using FlyingPress?
Without a page caching integration, Cloudflare still caches your images, CSS and JavaScript, which already helps. To cache full HTML pages on the free plan, you need something that also clears Cloudflare’s cache when you update a post:
- Your cache plugin’s Cloudflare integration, if it can cache pages at the edge and not only purge them. Check its documentation.
- Super Page Cache, a free plugin by Optimole that caches pages at Cloudflare with cache rules and purges them when content changes. I have not used it on this site.
- Cloudflare APO, a paid add-on of $5 a month on the free plan. It needs the official Cloudflare WordPress plugin.
Do not add a manual “cache everything” rule without automatic purging. Visitors would keep seeing the old version of a post after you update it, until you purge Cloudflare by hand.
Other caching settings
| Setting | My value | Why |
|---|---|---|
| Caching Level | Standard | The default, works with the rules above |
| Browser Cache TTL | 4 hours (default) | Left alone. The FlyingPress rules set their own browser TTL, so this value does not affect my pages or files |
| Tiered Cache | Smart Tiered Cache | Free. When one Cloudflare data center does not have a page, it asks another Cloudflare data center before asking my server |
| Crawler Hints | Off | It sends IndexNow pings. Rank Math’s Instant Indexing will do that job on my site |
| Always Online | Off | It shares site data with the Internet Archive and shows only limited old copies when the server is down |
| Development Mode | Off | Turn it on only while testing changes. It bypasses the cache |
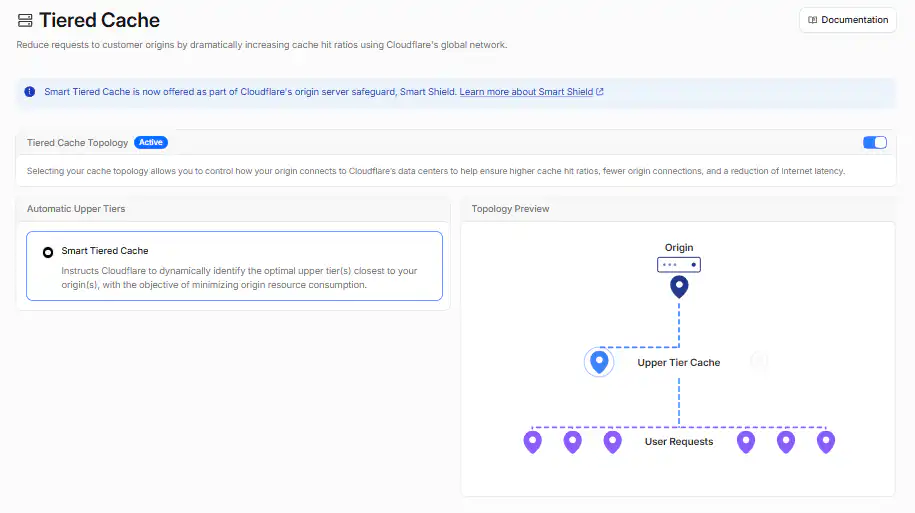
Are affiliate links cached? I checked
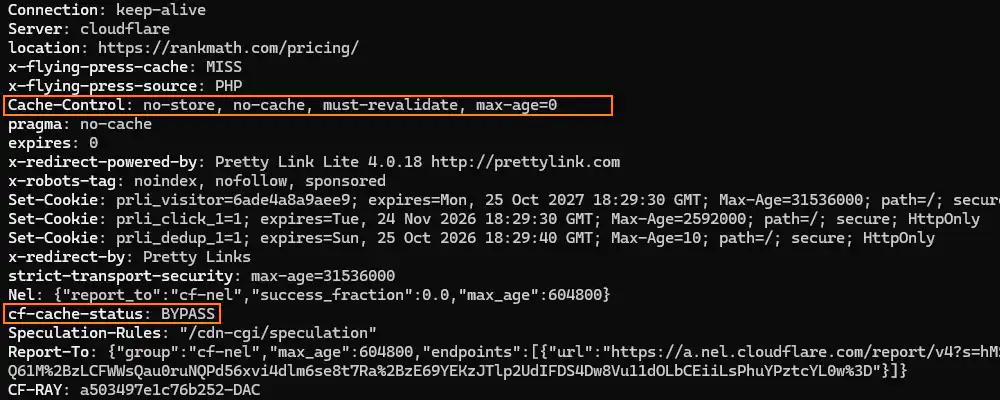
If you use cloaked affiliate links, this matters. A cached redirect could send visitors to an old target or skip your click tracking. I tested one of my Pretty Links with curl -sI https://webpickr.com/go/rankmath. It returned cf-cache-status: BYPASS and Cache-Control: no-store, so every click reaches the server and gets counted. No extra rule was needed.
Security Settings on the Free Plan
Go to Security > Settings. The free plan already includes DDoS protection and a free managed ruleset that are always on. These are the settings I changed or checked:
| Setting | My value | Why |
|---|---|---|
| Bot Fight Mode | On | Challenges automated traffic. I checked it does not block my own server (see below) |
| Browser Integrity Check | On | Blocks requests with suspicious browser headers |
| Email Address Obfuscation | Off | It was breaking email addresses in my content (see below) |
| Replace insecure JavaScript libraries | On | Free, automatic |
| Hotlink Protection | Off | Not needed for my site |
| Custom rules and rate limiting | None yet | I use two-factor login on WordPress instead (see below) |
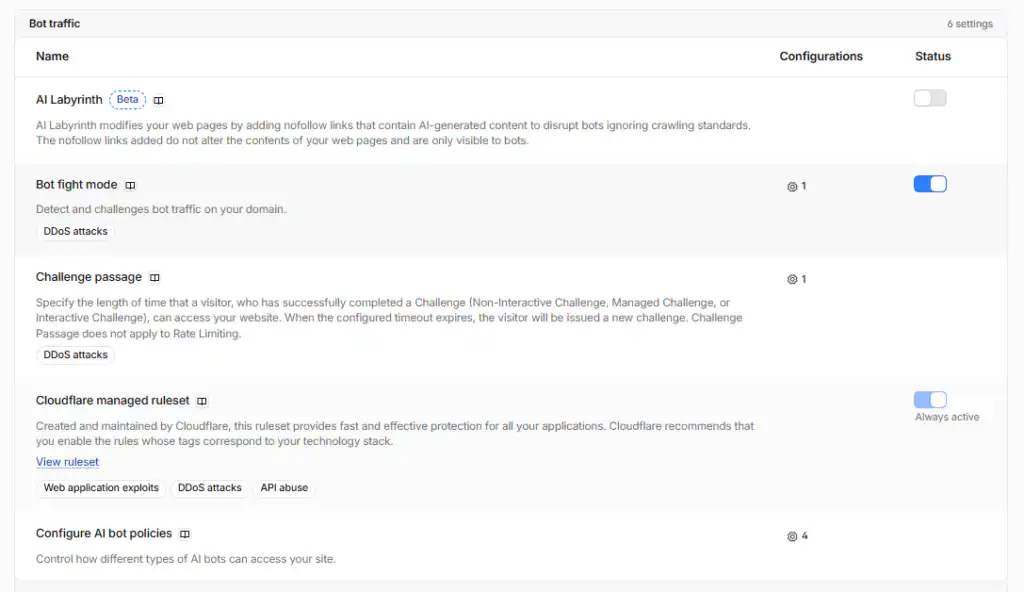
Bot Fight Mode: check your own server first
Bot Fight Mode on the free plan has one big limit. Cloudflare’s documentation says you cannot skip it with WAF custom rules. If it starts challenging something you need, your only real choice is to turn it off.
The risk on WordPress is your own server. WordPress sends some requests back to its own address, such as loopback checks. With Cloudflare in front, those requests go through Cloudflare too. To check, open Tools > Site Health in WordPress. On my site there was no loopback or REST API error, so Bot Fight Mode is not blocking the server and it stays on. I also checked Security Events: the blocks there were managed-rule blocks, mostly Meta’s AI crawler, and none came from Bot Fight Mode.
Why I turned off Email Address Obfuscation
This setting is on by default. It hides email addresses from spam bots by replacing them in the HTML and adding a small script that shows the real address in the browser. Normal visitors see the correct email. Anything that reads the page without running JavaScript sees “[email protected]” instead.
While checking my Cloudflare Email Routing guide as plain text, I found the address replaced in 7 places, including the settings tables. On a guide about setting up an email address, the address is the content, and AI answer tools would quote it broken. I turned the setting off, purged the cache, and checked again: zero replacements. If your site does not show example email addresses, leaving it on is fine.
Rate limiting and custom rules on the free plan
The free plan gives you 5 custom rules and 1 rate limiting rule. The rate limiting rule is weak: it counts requests over 10 seconds, can match only by path, and blocks for just 10 seconds. A slow brute-force bot passes under it. Instead of spending it on wp-login.php, I chose two-factor authentication on the WordPress login, which stops password guessing no matter how slowly the bot tries. A common free custom rule is blocking /xmlrpc.php, which is safe if you do not use Jetpack or the WordPress mobile app.
AI Crawlers: Block Training, Allow Search
Cloudflare’s AI Crawl Control page lists every AI bot that visits your site and lets you block each one, even on the free plan. My rule is simple. Bots that collect content to train AI models are blocked. Bots that fetch a page to answer someone’s question, and can link back to the site, are allowed.
| Type | Examples | My choice |
|---|---|---|
| Search engines | Googlebot, BingBot, Applebot | Allowed |
| AI search and assistants | OAI-SearchBot, ChatGPT-User, Claude-SearchBot, PerplexityBot, Perplexity-User | Allowed |
| AI training | GPTBot, ClaudeBot, CCBot, Bytespider, Meta-ExternalAgent | Blocked |
In the last 7 days, Googlebot made 104 allowed requests. GPTBot was blocked 7 times and Meta-ExternalAgent 18 times. I also turned on Bot Preference Sync, which adds Cloudflare’s AI rules to the top of my robots.txt.
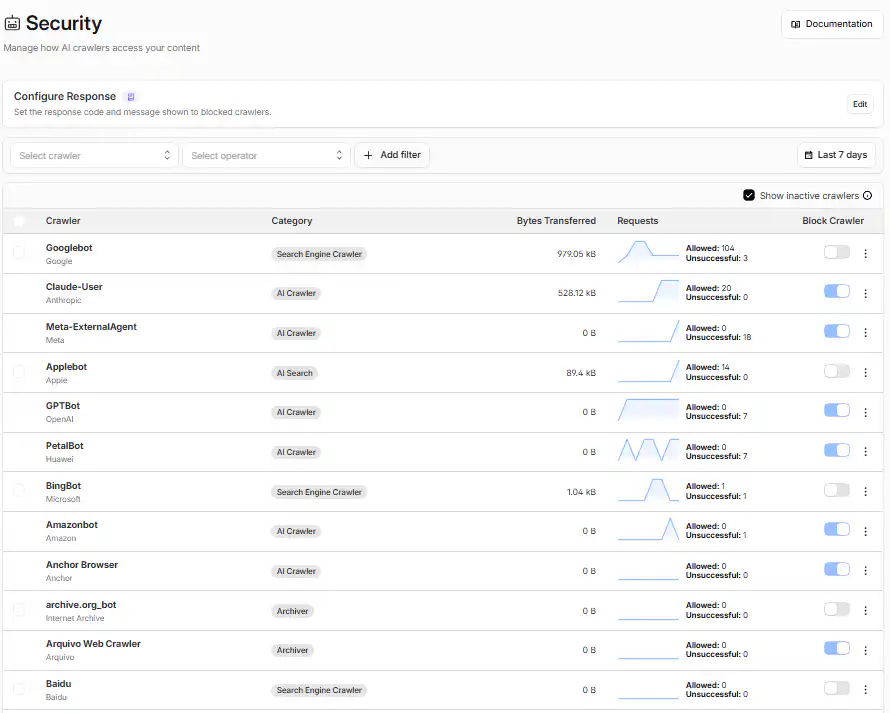
Some toggles cannot be changed, like Claude-User on my list. Since July 2026, Cloudflare groups AI bots into Search, Agent and Training, and its default policy blocks Training and Agent bots only on pages that show ads. My site has no ads, so Claude-User still got through (20 allowed, 0 blocked). If you add display ads later, review this policy under Configure AI bot policies.
Blocking Meta’s AI crawler does not break Facebook link previews. Previews come from a different bot that is not on this list.
Quick Checklist: My Cloudflare Settings for WordPress
| Section | Setting | My value |
|---|---|---|
| DNS | Website records (A, www) | Proxied |
| DNS | Mail and DKIM records | DNS only |
| SSL/TLS | Encryption mode | Full (strict) |
| SSL/TLS | Always Use HTTPS | On |
| SSL/TLS | Minimum TLS Version | TLS 1.2 |
| SSL/TLS | TLS 1.3, Automatic HTTPS Rewrites | On |
| SSL/TLS | HSTS | Off (server sends it) |
| Speed | Rocket Loader | Off |
| Speed | HTTP/3, 0-RTT, Early Hints, Speed Brain | On |
| Speed | Cloudflare Fonts, Web Analytics (RUM) | Off |
| Caching | Cache rules | Created by FlyingPress only |
| Caching | Tiered Cache | Smart Tiered Cache |
| Caching | Caching Level, Browser Cache TTL | Standard, 4 hours (default) |
| Caching | Crawler Hints, Always Online | Off |
| Security | Bot Fight Mode, Browser Integrity Check | On |
| Security | Email Address Obfuscation | Off |
| Security | Custom and rate limiting rules | None (2FA on login) |
| AI Crawl Control | Training crawlers | Blocked |
| AI Crawl Control | Search and assistant crawlers | Allowed |
| AI Crawl Control | Bot Preference Sync | On |
After changing settings, purge the cache once (FlyingPress > Purge Entire Cache also purges Cloudflare). Then run curl -sI on your homepage twice and look for cf-cache-status: HIT on the second run.
FAQ
Is the Cloudflare free plan enough for a WordPress site?
For a blog or affiliate site, yes. With a cache plugin that supports Cloudflare page caching, the free plan serves full pages from the edge. You also get free SSL, DDoS protection and bot controls. Image compression with Polish and the larger WAF rule sets need a paid plan.
Should I use Flexible or Full (strict) SSL?
Full (strict), as long as your server has a valid certificate. A free Let’s Encrypt certificate or a Cloudflare Origin Certificate both work. Flexible leaves the connection between Cloudflare and your server unencrypted.
Should I turn on Rocket Loader with a cache plugin?
Not if your cache plugin already delays or defers JavaScript. FlyingPress recommends keeping Rocket Loader off because the two can conflict.
Do I need Cloudflare APO for WordPress?
Not if your cache plugin can cache full pages at Cloudflare, like FlyingPress does on my site. APO costs $5 a month on the free plan and needs the official Cloudflare plugin. FlyingPress asks you to keep APO off when you use its integration.
Will blocking AI training bots hurt my Google rankings?
No. Googlebot is a search crawler, not an AI training crawler, and it stays allowed. On my site it made 104 allowed requests in the same week that GPTBot and Meta’s AI crawler were blocked.
Here is how I set up Redis object cache on aaPanel for several WordPress sites on one VPS. If you have not set up FlyingPress yet, start with my FlyingPress settings, since the caching part of this guide depends on it.
